
- All
- Product Name
- Product Keyword
- Product Model
- Product Summary
- Product Description
- Multi Field Search

Views: 0 Author: Site Editor Publish Time: 2026-07-31 Origin: Site


Setting up camp in the dark while digging through disorganized duffel bags creates immediate operational friction. You waste time searching for a crushed box of matches, only to discover your sleeping bag absorbed moisture from a leaky water jug. Acquiring high-quality outdoor gear is only half the battle. Maintaining and deploying that equipment efficiently requires a dedicated system. Poor storage habits lead to accelerated gear degradation, wasted setup time, and duplicated purchases when you cannot find what you already own. Transitioning from chaotic packing to a structured system demands modular gear management. You achieve this by selecting the right mix of rigid and collapsible camping storage containers, paired with a strict categorization framework. This modular approach provides a highly flexible, cost-effective alternative to expensive, permanent built-in drawer systems for trucks and vans.
Modularity is mandatory: A successful system relies on uniform, stackable dimensions that fit your specific vehicle's cargo footprint.
Match the container to the category: Heavy utility gear requires rigid, weather-sealed bins, while clothing and dry goods are better suited for space-saving foldable options.
Micro-organization prevents bin chaos: Utilizing packing cubes, translucent bags, and repurposed household containers inside larger bins is critical for rapid gear retrieval.
Accessibility dictates safety: Emergency essentials and quick-deploy items must follow a strict loading hierarchy so they are always reachable without unpacking the vehicle.
Post-trip maintenance dictates longevity: An organization system must include protocols for cleaning, drying, and inventorying gear before long-term garage storage.
Building a functional storage system requires more than buying random plastic boxes from a hardware store. You must evaluate how containers interact with your vehicle, the environment, and your physical limitations. A successful setup prioritizes speed, protection, and safety. We look at four main criteria before selecting any gear transport method.
Your vehicle dictates your storage capacity. Measure your trunk, truck bed, or rooftop cargo box before purchasing any containers. Pay close attention to wheel wells, sloping rear windows, and tailgate hinges. These elements drastically reduce usable volume. You need flush fitment to prevent load shifting during transit. Containers that slide around on dirt roads will damage your gear and potentially crack the plastic bins.
Choose dimensions that allow you to pack bins tightly against the backseats and each other. If you drive a mid-size SUV like a Toyota 4Runner or Subaru Outback, prioritize lower-profile bins that allow you to maintain rear-view mirror visibility. For truck owners, measure the height below the tonneau cover. A bin that sits half an inch too high renders your bed cover useless. Utilize L-track systems or factory tie-down points to secure the base layer of your storage system with ratchet straps.
You must balance weather protection with ventilation. Hermetically sealed bins feature EPDM rubber gaskets that lock out fine dust, rain, and insects. These are mandatory for open truck beds or exposed roof racks. However, sealed bins also trap moisture. If you pack a damp tent into a sealed bin, mildew will destroy the polyurethane waterproof coating within days. Altitude changes can also cause sealed bins to vacuum-lock, making the lids nearly impossible to pry off at high elevations without a pressure release valve.
Ventilated containers prevent moisture buildup but expose your gear to environmental elements. Use sealed bins for dry utility gear, recovery equipment, and kitchen supplies. Use breathable or foldable containers for clothing and sleeping bags, ensuring they are stored inside the vehicle cabin rather than an exposed truck bed.
Clear plastic bins offer massive operational speed. You can perform an at-a-glance inventory without opening lids. This helps you quickly locate a specific tool or spice jar. However, clear bins expose your gear to ultraviolet light. UV rays degrade nylon tents, sleeping bags, and climbing ropes over time. Clear bins also advertise your expensive equipment to potential thieves at trailheads or hotel parking lots.
Opaque bins provide UV protection and security but require strict labeling. For the best of both worlds, use opaque bins for high-value or UV-sensitive gear, and utilize small translucent organizers inside them. If you run a cargo cover or heavily tinted windows, the security risk of clear bins drops, but the UV degradation risk remains if you leave them sitting around the campsite during the day.
Loaded bin weight directly impacts your physical safety and camp setup speed. A single massive 100-liter trunk might hold everything, but it requires two people to lift and becomes a disorganized black hole. Multiple mid-sized bins are operationally superior. Keep individual bin weights under 40 pounds. This allows one person to easily lift, stack, and maneuver the containers over uneven terrain.
Smaller bins also give you granular control over vehicle weight distribution. You can place heavy utility bins low and directly over the rear axle to maintain vehicle handling stability. Placing heavy bins on a roof rack raises your center of gravity, increasing body roll and rollover risk on off-road trails. Keep roof loads restricted to lightweight, bulky items like sleeping bags and empty water jugs.
No single container type solves every storage problem. A robust system utilizes different structural designs based on the gear they hold. You must match the physical properties of the bin to the demands of the equipment.
Rigid containers form the foundation of your gear management. They offer high load-bearing capacity, allowing you to stack heavy items without crushing the bottom box. Look for models with reinforced corners, interlocking lids, and heavy-duty metal latches. Using stackable camping storage bins prevents shifting during off-road travel. The interlocking channels on the lids lock the base of the top bin in place.
These bins excel at holding heavy tools, cast iron cookware, sharp utility gear, and spare vehicle fluids. The rigid walls protect delicate items like camp stoves from impact. The primary trade-off is volume inefficiency. A hard-sided bin consumes the exact same amount of cargo space whether it is packed full or completely empty. They also carry a higher weight penalty due to the dense, impact-resistant polypropylene plastics required for manufacturing.
Collapsible containers solve the empty-space problem. They balance usable interior volume with the ability to fold flat when not in use. Many modern designs feature side-access doors. This allows you to retrieve items from the bottom of a stack without removing the bins on top, drastically speeding up camp operations.
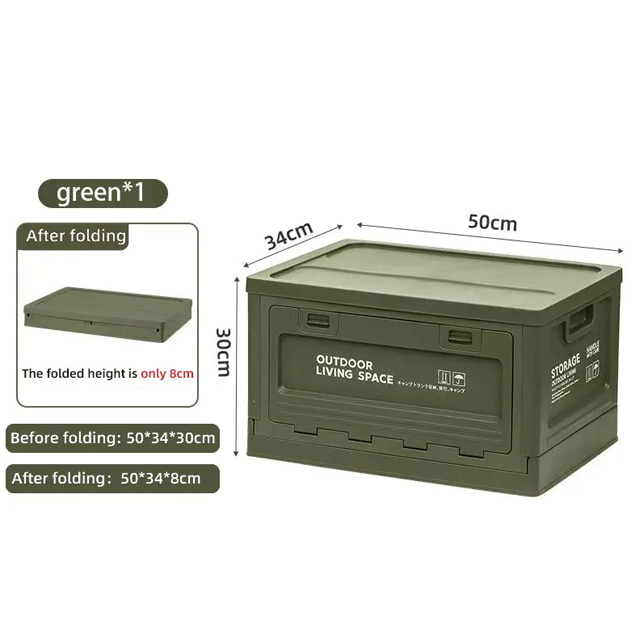
A 41L foldable camping storage box is the ideal size for dry pantry items, camp kitchen consumables, and bulky clothing. It is large enough to hold loaves of bread and bags of coffee without crushing them, but small enough to remain easily portable. The trade-off is structural integrity. Foldable boxes cannot support the extreme top-weight that rigid bins handle. The hinges and side panels can become points of failure if you over-torque them or force oversized gear inside.
When you need maximum volume for lightweight gear, oversized collapsible containers are highly effective. These units prioritize space over heavy-duty impact resistance. They are designed to transport bulky items from the vehicle to the campsite in one trip.
A large foldable camping container is perfect for high-loft items like sleeping bags, multi-person tents, and camp blankets. They work exceptionally well for basecamp setups. Once you deploy your sleeping gear into the tent, you can collapse the container and slide it under a cot, keeping your campsite clutter-free. However, these large containers are prone to bowing if you pack them with dense, heavy items. They also offer limited weather resistance, so they must be kept inside the tent or vehicle during rainstorms.
Container Type | Best Use Case | Key Advantages | Primary Limitations |
|---|---|---|---|
Hard-Sided Rigid Bins | Tools, cast iron, stoves, heavy utility gear | Maximum impact protection, weather-sealed, supports heavy stacking | Consumes full volume when empty, heavier base weight |
41L Foldable Box | Dry food, kitchen consumables, clothing | Collapses flat, side-access doors, lightweight | Lower weight capacity, hinges can fail if overloaded |
Large Foldable Container | Sleeping bags, tents, blankets, basecamp gear | Maximum volume for bulky items, easy to store out of the way | Prone to bowing with heavy loads, minimal weather resistance |
Throwing all your gear into uniform boxes will not solve your organization problem. You must categorize your equipment based on when and how you use it at the campsite. Grouping items by function prevents cross-contamination and speeds up deployment.
Break down your gear into functional deployment zones. Each zone gets its own dedicated container. This prevents you from digging through sleeping bags to find a spatula.
The Quick-Access/Emergency Box: This container holds first aid kits, jump starters, tire deflators, headlamps, and rain gear. It must be the most accessible container in your vehicle. You should never have to unstack other bins to reach your emergency supplies.
The Kitchen Box: This holds your stove, fuel canisters, pots, utensils, and cleaning supplies. It requires strict spill-proof interior organization. Keep soap and cooking oils in sealed secondary bags to prevent catastrophic messes.
The Utility/Shelter Box: Pack your tent stakes, mallet, paracord, duct tape, tarps, and lantern here. This is the heavy-duty box that gets deployed first when setting up the actual campsite infrastructure.
The Sleep/Comfort Box: Dedicate a clean, dry space for linens, sleeping pads, pillows, and tent accessories. This box must remain free of dirt, fuel, and food odors.
Large bins quickly turn into chaotic junk drawers if you do not organize the interior space. Micro-organization is the secret to rapid gear retrieval. Use color-coded packing cubes to separate clothing types or individual family members' gear. Heavy-duty ziplock bags are excellent for waterproofing small items like matches, batteries, and spices.
Upcycle household items to save money and protect gear. Old plastic coffee containers are perfect for safely storing loose hardware, fire starters, or spare batteries. They prevent items from rolling around and getting crushed. Utilize small translucent tackle boxes or interior organizers for your camp kitchen. This allows you to visually inventory your utensils, lighters, and cleaning sponges without unpacking individual kits.
To properly micro-organize a kitchen box, follow this sequence:
Line the bottom of the bin with a non-slip silicone mat to prevent hard items from rattling.
Place heavy, flat items like cast iron skillets or cutting boards at the base.
Store all liquids inside a leak-proof secondary container or heavy-duty ziplock bag.
Group utensils into a canvas tool roll to prevent them from scratching non-stick cookware.
Pack delicate items like French presses or coffee mugs inside soft items like dish towels to provide shock absorption.
Implementing a new storage system requires a methodical approach. Do not buy containers until you know exactly what you need to store. Follow this sequence to build an efficient, long-lasting setup.
Start by laying out every piece of camping gear you own in your garage or living room. Inspect everything. Discard broken tent poles, expired first aid supplies, and empty fuel canisters. Clean off dried mud and wash all fabrics. Once your gear is clean and functional, group the items physically on the floor using the "Zone" method discussed above. Seeing the volume of each zone dictates what size containers you actually need.
Choose your ratio of rigid bins to foldable boxes based on your gear audit and vehicle cargo space. If you have a large truck bed and heavy off-road gear, lean heavily toward rigid, weather-sealed bins. If you drive a crossover SUV and stick to established campgrounds, a mix of one rigid utility bin and several foldable boxes for food and clothes is highly efficient. Ensure all selected containers share the same footprint so they interlock securely when stacked.
A bin system fails if you cannot identify the contents instantly. Use high-contrast gaffer tape and thick permanent markers to label each box. Gaffer tape is durable, weather-resistant, and leaves no sticky residue when you need to change the label. Apply labels to both the top lid and at least two sides of the container. This ensures visibility regardless of how the bins are stacked in the vehicle. For advanced setups, use color-coded tags or QR-code inventory stickers linked to a spreadsheet on your phone.
Packing your vehicle involves basic physics. Place heavy, rigid utility and kitchen bins at the bottom of the stack, pushing them as far forward over the rear axle as possible. This lowers your center of gravity and improves vehicle handling. Stack lighter, foldable containers holding clothes and sleeping bags on top. Finally, position your Quick-Access/Emergency Box at the tailgate or nearest door. You must be able to grab your headlamp or first aid kit within seconds of opening the trunk.
Even well-planned systems fail if you ignore basic maintenance and physical limitations. Avoid these common pitfalls to keep your gear safe and your containers intact.
Respect the weight limits of your containers. Overpacking a foldable box leads to broken latches, bowed bottoms, and collapsed walls. If you have to force the lid shut by sitting on it, the bin is too small. Straining the plastic compromises the weather seals and weakens the hinges. Distribute heavy items across multiple bins rather than maxing out the capacity of one.
Moisture is the enemy of camping gear. Storing equipment in sealed bins without proper drying guarantees mildew growth. Tents and sleeping bags must be completely air-dried before long-term storage. Even ambient humidity trapped inside a sealed bin can cause rust on cast iron and mold on fabrics. Add silica gel desiccants to your utility, kitchen, and sleep boxes to absorb residual moisture. Store your bins in a temperature-controlled environment rather than a damp shed.
Never create a miscellaneous bin. A junk drawer bin represents an operational failure. It becomes a dumping ground for items you are too lazy to categorize, making it impossible to find small tools when you need them. Force every single item into a specific functional category. If a piece of gear does not fit logically into your kitchen, utility, sleep, or emergency zones, evaluate whether you actually need to bring it at all.
Organizing camping gear requires creating a scalable, modular system tailored to your specific deployment zones and vehicle constraints. A well-executed system reduces setup time, protects your investment, and removes the friction from outdoor travel. If you are building a system from scratch, start small. Purchase two rigid stackable bins for your utility and kitchen gear, and one foldable box for your dry goods. Test this setup on a weekend trip to identify your personal workflow before expanding into a massive container array.
Measure your vehicle's cargo area to determine your maximum container dimensions.
Conduct a complete gear audit and discard broken or expired equipment.
Map out your "Zone" categories and group your gear physically on the floor.
Order your initial mix of rigid and foldable containers based on your volume needs.
A: Use high-contrast gaffer tape and thick permanent markers. Gaffer tape withstands temperature changes, resists moisture, and peels off cleanly without leaving adhesive residue. Always label the top lid and at least two sides of the bin. This ensures you can identify the contents whether the bin is sitting on the ground or buried at the bottom of a stack.
A: Yes, but they have specific use cases. They are excellent for dry goods, clothing, and lightweight camp accessories. They are not designed to hold heavy tools or withstand severe impacts. To ensure longevity, do not exceed their stated weight limits and avoid over-torquing the side-access hinges when packing bulky items.
A: Never pack damp gear. Thoroughly air-dry tents, tarps, and fabrics before storing them. Place large silica gel desiccant packs inside sealed bins to absorb ambient humidity. Avoid storing sealed bins in direct sunlight, as temperature fluctuations can cause condensation to form on the interior walls.
A: The 40L to 60L range is the sweet spot for car camping. Bins in this size range offer ample storage capacity while remaining light enough for one person to lift safely. They also fit easily into most SUV trunks and backseats. Containers larger than 80L become too heavy to maneuver when fully loaded.
A: Use micro-organization tools. Color-coded packing cubes work well for clothing and soft goods. Small translucent tackle boxes are perfect for batteries, first aid supplies, and repair kits. Repurpose plastic coffee containers to protect fragile items or isolate messy gear like fire starters. Heavy-duty ziplock bags keep spices and hygiene items waterproof.


